guides › Install on your computer › Raspberry Pi gateway
weechat-radio:$ Raspberry Pi gateway
A Raspberry Pi and a Digirig make an always-on gateway in internet-radio mode: a station that is always listening, carries email and messages from the Radio+ stations around it to the internet, and needs nobody at a keyboard. You look after it from a web portal on your own network. About 20 minutes.
What it is for
A station on a laptop goes off the air when the laptop closes. The Pi does not. Set to internet-radio mode, it stays on one frequency day and night and does the gateway work for everyone who can reach it:
- A reliable point for sending email A station in Radio+ mode has no internet. Its email goes out by radio to a Mail gateway: on Auto it finds the gateway that hears it best, or it uses the callsign typed in its setup. That gateway posts it. Because the Pi is always on, it is always there to answer, and replies come back the same way.
-
A high-point gateway for a group on Radio+
Put the Pi where the radio reaches furthest: a loft, a mast, a hill with power and a connection. When everyone else is out on Radio+, it is the one station that hears them all and carries their messages,
#bulletinand mail onto the internet. - Looked after from a web portal Its web portal shows whether it is on the air, what it hears, levels and health. The portal can also send chat and mail through the station, which is handy, but not why you build one.
How it fits together
What you need
- A Raspberry Pi 3, 4 or 5 A 16 GB+ microSD card for Raspberry Pi OS Lite (64-bit), and the official power supply: a weak one makes the Pi drop the Digirig.
- A Digirig Or another USB sound card with VOX or CM108 PTT. Use a USB-C cable that carries data, not a charge-only one.
- A radio left on one frequency It must be able to transmit: a gateway sends receipts and answers mail requests.
- A browser on the same network Phone, tablet or laptop: the portal is a web page. The Pi on Ethernet is the most reliable; Wi-Fi works.
Install and start it
Start with a fresh microSD card. Everything after step 1 happens on the Pi, logged in as your own user (not root), over SSH or with a keyboard and screen.
-
Write the SD card
On your laptop, open Raspberry Pi Imager. Pick your Pi model, then under Operating System → Raspberry Pi OS (other) choose Raspberry Pi OS Lite (64-bit). It must be the 64-bit image: the installer only has a 64-bit build. Lite is enough, there is no desktop to run.
When Imager asks to apply OS customisation, say Edit settings: set the hostname (
raspberrypiis fine), your username and password, your Wi-Fi if the Pi is not on Ethernet, and on the Services tab turn on SSH. Write the card, put it in the Pi, power it on and wait about two minutes. Then from your laptop:ssh you@raspberrypi.local(or the Pi’s IP address from your router). -
Install WeeChat Radio
curl -fsSL https://weechatradio.com/install.sh | sh
On a 64-bit Pi this fetches the
linux-aarch64build ofwcrandmodem73into~/.local/bin, and installs the few libraries modem73 needs with apt. No desktop is needed. If anything is missing, the installer stops and names it. -
Let your user reach the Digirig
sudo usermod -aG dialout,audio $USER
Log out and back in.
-
Set the station up
wcr setup
Choose Handheld + Digirig (or your radio), the preset for the band, and the frequency the radio stays on. The serial and audio pickers start on the Digirig (
plughw:CARD=Device,DEV=0), so Enter is right; the Pi’s ownHeadphonescard cannot hear the radio. With a radio and the internet, setup picksinternet-radiomode. That is the gateway mode: keep it, or the Pi is just another radio.At the end, setup asks for a password for the web page (at least 8 characters), then whether to start the station now and at every boot. Say yes; sudo asks for your password once. That adds the
wcr-webservice, which runs as your user and restarts by itself after a crash. Check it withsystemctl status wcr-web; its log isjournalctl -u wcr-web -f. If you said no, runsudo ~/.local/bin/wcr web installlater. -
Open the page
Open
https://raspberrypi.local:8443(your Pi’s name; more under Open the web portal, below) and log in. The station is on the air; Stop and Start are on the Station card. They are remembered: after a reboot or an update the station goes back on the air only if you left it running.
Open the web portal
From any browser on the same network, open https://raspberrypi.local:8443 (your Pi’s name), or its IP address, for example https://192.168.1.158:8443. Right after the first boot the .local name can take a few minutes to work; hostname -I on the Pi shows the address.
Or let a laptop find it: run wcr webui on any computer with WeeChat Radio. It finds the Pi on your network, prints the address and opens it. --qr also prints a QR code to scan. On the Pi itself, wcr webui prints the page’s addresses and a QR code for your phone.
- HTTPS. The Pi makes its own certificate, so the browser warns once. Check it is your Pi’s address, then continue.
- Password. A login lasts 12 hours of use.
- Your network only. The page answers only local addresses. Do not forward port 8443 on your router. modem73’s own ports listen only on the Pi itself, so nobody on the network can key the radio through them.
The Station view
One column, most important first. It refreshes by itself every few seconds.
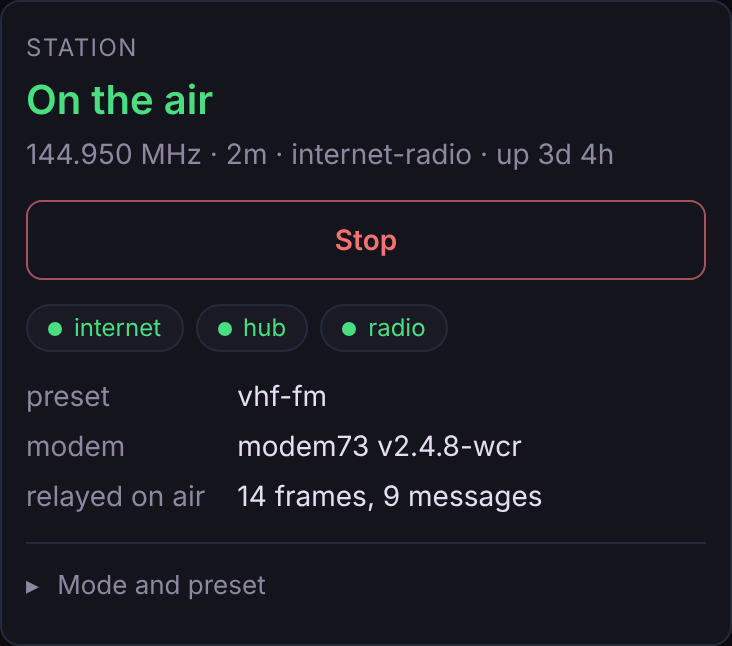
Station. On the air or not, why, and Stop / Start. Lights for internet, hub and radio. The dial frequency (wcr never retunes the radio, so turn its dial to match), mode and preset pickers, and the gateway mode: chat and mail, or mail only for an unattended Pi that should hear and show chat but key only mail. 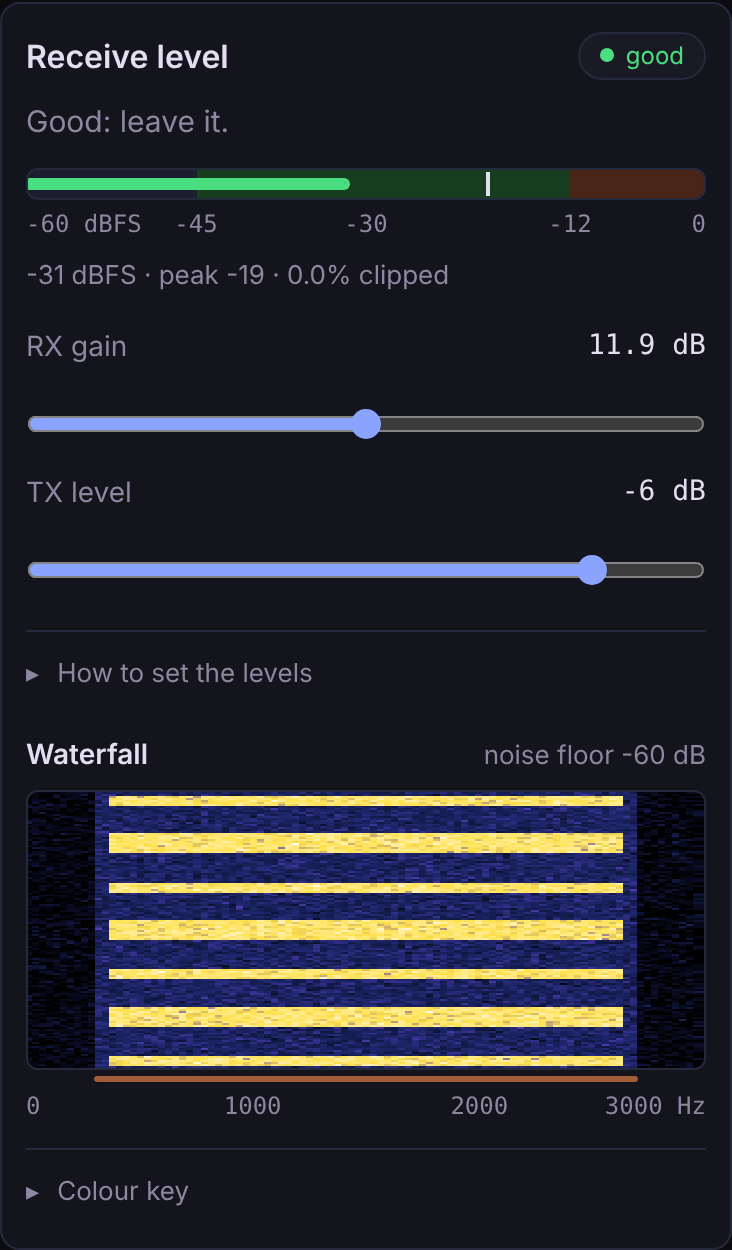
Receive level. The meter, RX gain and TX level sliders, and a live waterfall of the radio’s audio. 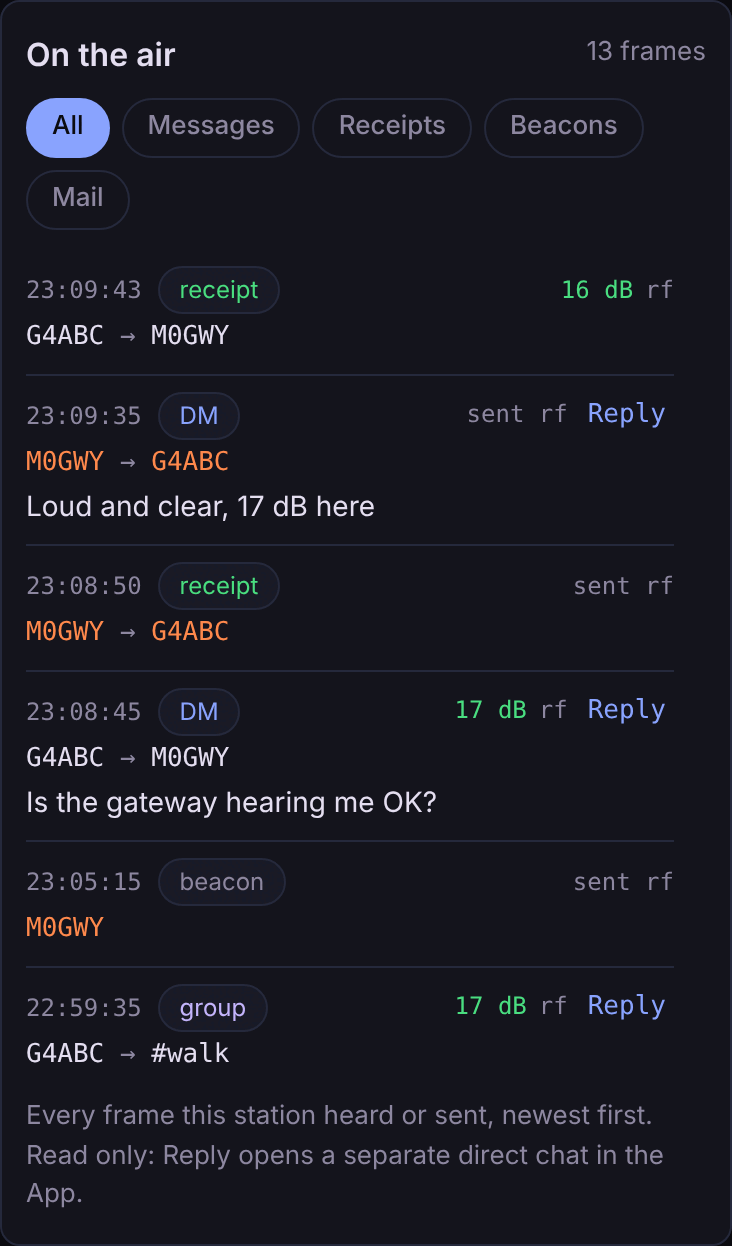
On the air. Every frame heard or sent: messages, receipts, beacons, mail, with SNR and how it came. 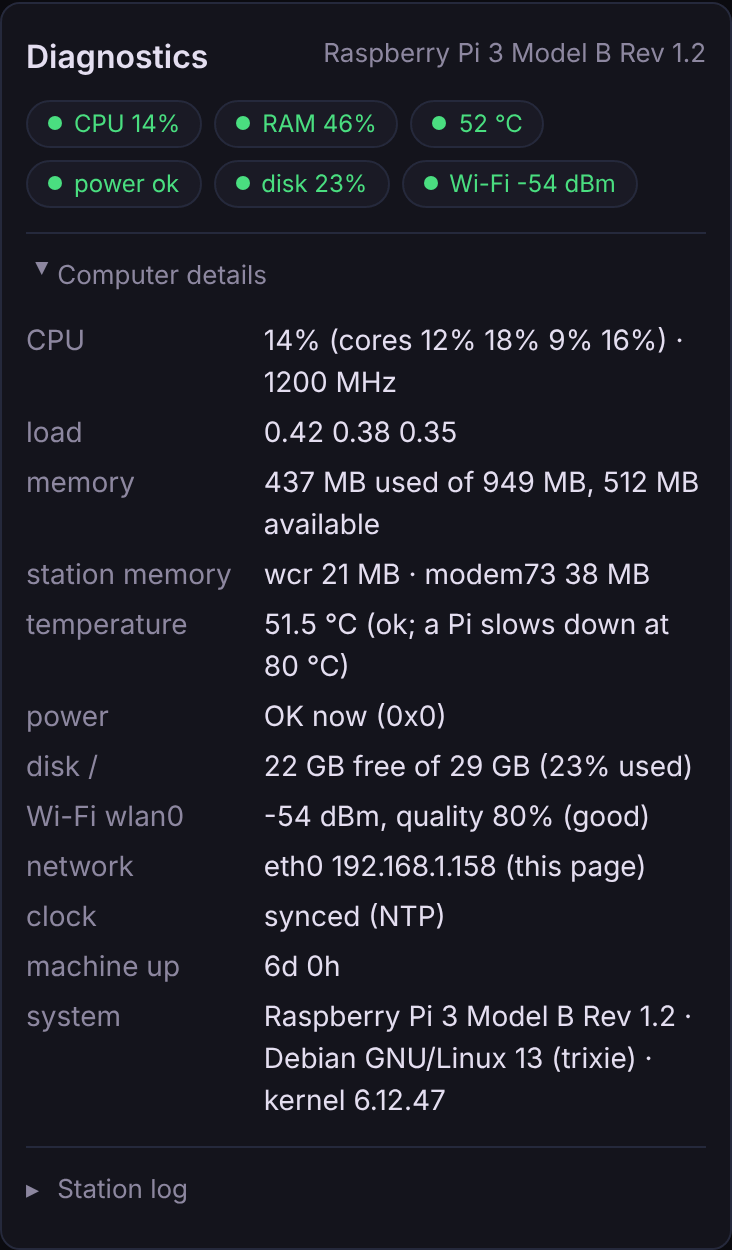
Diagnostics. CPU, memory, temperature, power, disk and Wi-Fi, then errors and the station log.
Screens from the Pi’s real page with made-up stations and mail. Tap one to see it full size.
Further down: Stations heard (with SNR: 10 dB or more is comfortable) and Mail through this station, with each mail’s delivery status. The radio light is green only while modem73 runs and has its sound card; if it is not, the Errors box says why. The power chip turns amber or red when the Pi has been short of power.
An extra: chat and mail from the browser
The gateway runs without anyone using it. But since it is a full station, its page also has an App view (at the top of the page, or /app) that lets anyone on your network chat and send mail through it, without the desktop app. It sends exactly as the desktop app does, so the same on-air, hub and gateway rules apply.
- [G4ABC] Is the gateway hearing me OK? [rf] 17 dB
- [M0GWY] Loud and clear, 17 dB here [..][tx][tx] [ok rf]
- [G4ABC] Great, heading up the ridge now [rf] 16 dB
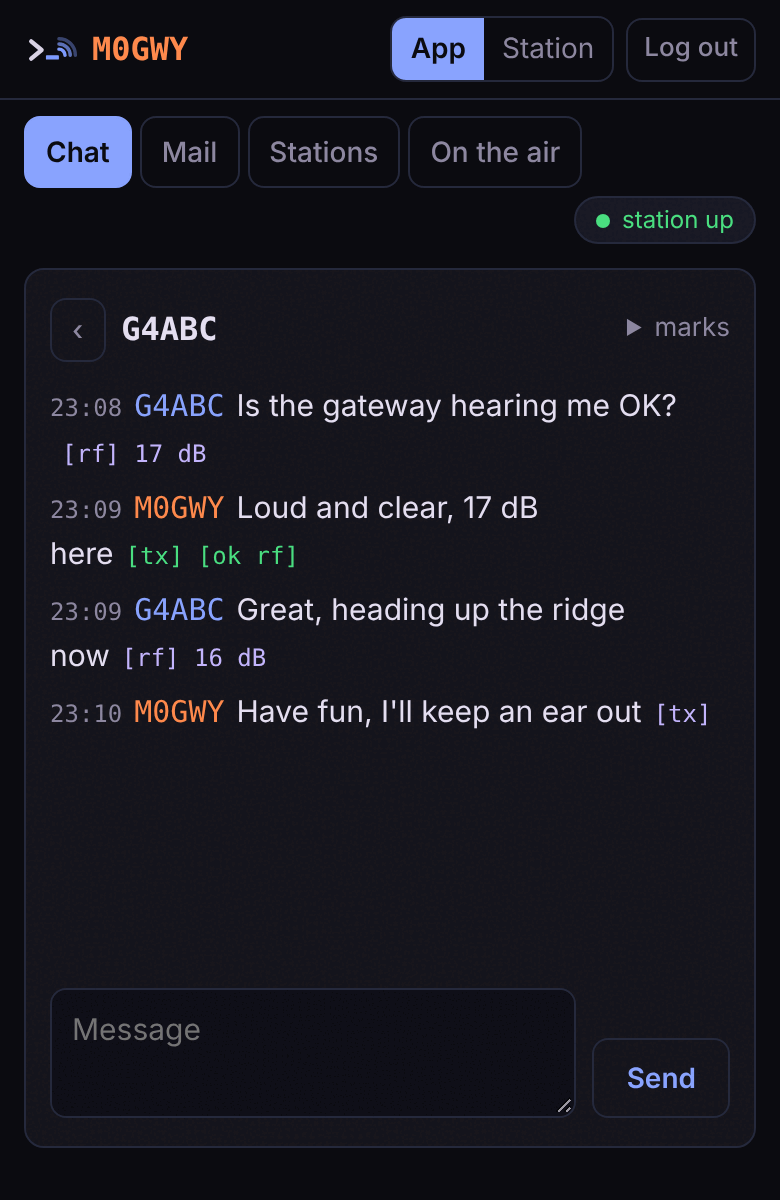
Chat. Your channels and direct chats, with history. New lines appear by themselves. 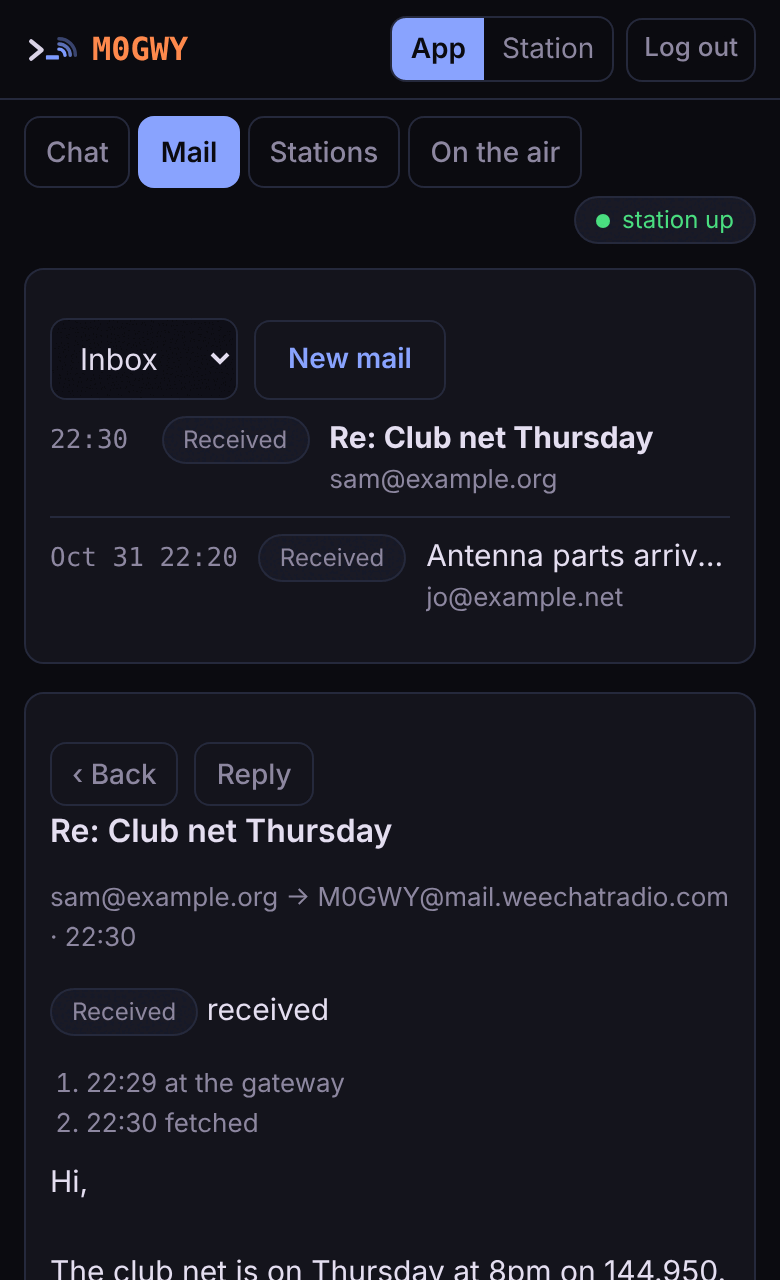
Mail. Inbox, Outbox and Sent with status chips. New mail, Reply, and Retry on a failed one.
Stations lists who the station has heard, newest first; Message opens a direct chat. On the air is the same list as on the Station view, and Reply there opens a separate direct chat. Slash commands, closed channels and invites stay in the desktop app for now. Every mark is explained under marks next to the conversation name.
Set the levels once
-
Squelch 0
On the gateway’s radio and on the handhelds that talk to it. A data burst is short and squelch 1 chops it. Turn the speaker volume down rather than the squelch up; the hiss does not stop the gateway sending on FM. Turn off scanning, dual watch, power saving and VOX on the radio itself.
-
Receive: RX gain
Move RX gain on the Receive level card until the hiss sits in the meter’s green band (−45 to −12 dBFS) and nothing clips. The hint under the meter says which way to go. If RX gain is at 0 dB and it still clips, turn the radio’s volume down.
-
Transmit: Speaker, then TX level
The Digirig’s Speaker level sets the deviation. Set it once with
alsamixer -c Device(F3 for playback), thensudo alsactl store. Fine-tune with TX level (it only turns down) while watching the far station’s SNR.
Then do the signal check below with a second station.
Quick signal check
With a second station a few metres away, on the same frequency and preset, squelch 0 on both:
- It hears the gateway. About a minute after Start, the gateway’s beacon shows in the other station’s heard list with an SNR.
- The gateway hears it. Send a bulletin from the other station. It shows under On the air with its SNR, and the meter does not say clipping.
- The SNR is comfortable: 10 dB or more in the same room. A few dB means a level is off.
- A long message gets through. About 500 characters each way arrives whole, and the sender sees
[ok rf].
If 1 fails and 2 works, look at the transmit side (Speaker, TX level, PTT). If 2 fails, the receive side (RX gain, radio volume, squelch).
If something is wrong
- The Digirig does not show up
lsusbshould list10c4:ea60and0d8c:013c. Try a USB-C cable that carries data and the official power supply.vcgencmd get_throttledmust say0x0.raspberrypi.localdoes not answerRun
wcr webuion a laptop, or use the Pi’s IP address.- The radio light is red
The Errors box on the Station view says why. modem73’s full log is
~/.local/share/wcr/modem73.log.- Audio in says “not measured”
The modem73 next to
wcris an older one. Update from the Software card (below).
Updating
Updates happen on the web page, with no SSH and no password. The Software card says Update available when there is a new version; press Update.
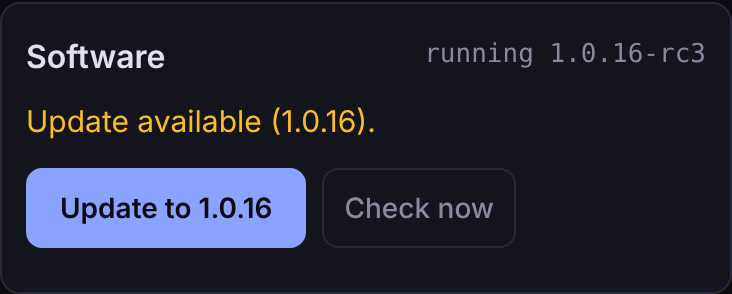
Software. The running version, Update when there is one, and Check now.
-
It downloads and checks
The download’s SHA-256 must match, and
wcr.tomlis copied towcr.toml.before-updatefirst. -
It waits for a quiet radio
Nothing sending or being heard, no mail being passed, no beacon about to go. The card says what it is waiting for. It never cuts a transmission off; after 15 minutes of a busy channel it gives up and says so.
-
It restarts itself
Same service, same user, no sudo. The page reloads on the new version within a minute and you stay logged in. The station comes back on the air only if it was running before.
-
It rolls back if it has to
If the new version does not start, or its station does not stay up for a minute, the previous version comes back by itself and the card says Rolled back and why.
If the card says Installed x / Running y, a newer version is installed but not running yet (for example after wcr update in a terminal); press Restart to finish.
Coming from v1.0.16-rc2 or older, do that one update over SSH: wcr update --rc, then sudo systemctl restart wcr-web. After that, the page does it.
Make sure your licence allows unattended or remote operation on that band, and that you can always stop it: the Stop button, sudo systemctl stop wcr-web, or the radio’s power switch.
From a terminal
You do not need these day to day; the web page does it all. Over SSH they work as your own user, without sudo unless shown. wcr is on every shell’s path, so ssh you@raspberrypi.local wcr status works from a laptop too.
wcr statusInstalled and running version, the web page, the station and whether the radio is busy, and whether an update is out.
wcr updateThe same as the Update button: download, check, wait for a quiet radio, restart, check it runs. Ends with one line, for example
Updated to 1.0.16, running, radio idle.wcr restartRestart on the installed version once the radio is quiet. The station comes back as you left it.
wcr webuiOn the Pi: the page’s addresses, whether the service runs, and a QR code for your phone. On a laptop: finds the Pi and opens the page.
wcr setupChange the radio, band or frequency. Safe to run again: it keeps the password and settings it does not ask about. Stop the station first if you want to test the sound card.
wcr web passwordChange the web page password.
sudo ~/.local/bin/wcr web installStart it at boot, if you said no at the end of setup.
sudo systemctl stop wcr-webStop everything until the next boot (
startbrings it back). The log:journalctl -u wcr-web -f.wcr update --rcTest versions (release candidates). Only from a terminal; once on one, the page offers the next test version too.
Every detail and setting: PI-GATEWAY.md. Related: handheld + Digirig · email · cross-frequency chat.